
Warning: This is a very long post. However, that’s because it’s packed with a lot of information. This was quite an undertaking that took a lot of research. It wasn’t difficult, just time consuming. I am giving all the gory details in case you’d like to replicate the process, but if you’re only mildly interested, just look at the pictures.
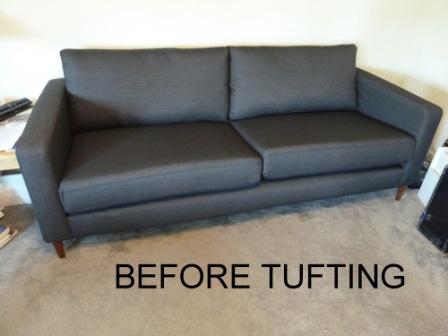
I think button tufted sofas are very classy looking, and have wanted one in my living room for some time. However, there were three hurdles to overcome before that could happen.
Hurdle one is named Carolina. Our cat still has her claws, and while she doesn’t annihilate furniture, she is known to give it an occasional swipe. I’m constantly telling her she’s why we can’t have nice things. She certainly is why I’ll never own leather furniture, and a lot of the button tufted sofas are leather.
Problem number two is comfort. For some reason all of those buttons often lead to a sofa that’s part décor/part torture instrument. I was willing to forgo a great deal of cushiness for aesthetic value, but the husband was not.
The final and biggest hurdle was price. I swear those buttons are made out of unicorn tears or something, because tufted sofas seem to run around $2000. I am cheap. I was not doing that. Especially since I wanted to buy two sofas at once for my living room.
I was sure I was just going to be saving my pennies for decades or settling for something else. Then I found this informative blog post about how someone button tufted an IKEA Karlstad sofa. This solved all of my problems at once. It was fabric, very comfy, and affordable. The people at the Our Mid Century blog were fortunate enough to find an upholster to put their buttons on for them for a mere $40. If you can find someone to do it for that price, PAY IT!
If, like me, no super cheap upholsters are handy or if you also want to be a nut and do lots of different fabric buttons, read on. I’m going to tell you how I did this step by step, including where I was able to buy all the materials online. That took me nearly as long as anything.
Step One: Decide what legs you want on your sofa. You’d think it would be buying the sofa at IKEA, but you’d be wrong. The legs on the Karlstad sofa look roughly like someone slapped the ends of 2×4’s on the bottom because the designer got tired and didn’t care anymore. More likely, it’s a cost saving measure, but just changing out the legs on the sofa make a huge difference.

You can go two routes here. One is Pretty Pegs. They’re a Swedish company that wisely noticed that IKEA almost universally makes ugly legs for its furniture. All they make is replacement legs that screw right into your IKEA furniture. They come in a number of set models and would likely ship them to you in a timely manner. However, a set of pegs (four) runs you a little over a hundred dollars. This seemed a bit excessive to me, so I went with Uncle Bob.
Who in the world is Uncle Bob? Uncle Bob is some guy in Texas who has a very old looking website that you’d swear is defunct. However, Bob also makes very classy looking custom replacement IKEA legs in a number of woods, stains, and heights. I got the poplar wood, 5 ½ inch, full taper, medium brown stain. For a set of four, Bob charged me the super reasonable price of $36 plus $6 flat rate priority shipping.
The one drawback is that Bob makes all of his legs to order, and he’s a very busy man. I placed my order on April 15. Uncle Bob very kindly emailed me to let me know he had received my order and would put me on his schedule, and I should receive my couch legs in the second week of June. I did indeed receive them two months later as he said I would, and they were beautiful and screwed right into my sofa perfectly. Still, I wasn’t prepared to have to wait two months for couch legs.
Step Two: Decide what you want your buttons to look like. If you want your buttons to be the same solid color as your sofa, often you can get the IKEA customer service people to give or sell you fabric samples of whatever slipcover color you choose. Or, in a worse case scenario, you can purchase an ottoman slipcover, which are cheaper than the sofa slipcovers, and use that fabric to cover your buttons. Look on ebay and Craigslist before you shell out the full price bucks for this at IKEA, though. I noticed a lot of people selling brand new slipcovers on there.
I wanted my buttons to be more interesting than that. In truth, I’m tempted to buy sofas in wild colors and patterns, but the practical part of me usually wins out as I know whatever I pick out might be out of fashion before I can afford another sofa. Better to be bold with my throw pillows. Still, I needed my sofa to be a little bit fun. So, I decided to cover the buttons in a number of bold prints, just in neutral colors that would go well with the charcoal colored slipcover I had chosen (Sivik dark gray).
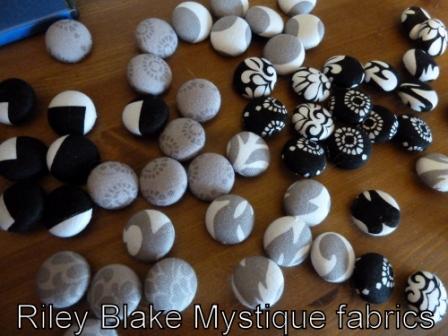
I decided on eight different fabrics that were all part of the same Riley Blake color way (a set of quilting fabrics designed to go together): Mystique Damask, Petal, Dot, & Stripe in Gray and Mystique Damask, Petal, and Stripe in Black and Medium Chevron in Black. I bought all of them at the Etsy shop Fabric Shoppe because they had the selection I wanted, good prices, were easy to work with, and they let me buy a just a quarter of a yard of all of those different fabrics. I purchased two of their Pick 4 quarter yard bundles ($10 a piece, plus $4.50 shipping).
You also need to decide how many buttons you want, and how big you want them. I liked the look of Our Mid Century’s sofa, so followed their lead, using eight ¾ inch buttons a side on each cushion. When you button tuft, you have to put buttons on both the front and back of the cushions. That meant I needed 16 buttons per cushion x 4 cushions = 64 buttons for one couch. I did two couches, so I had to make 128 fabric covered buttons. The bad news is you have to make a ton of buttons. The good news is you can rotate your cushions this way. Get a stain on one side? No problem, just flip it over. Also, tufting the cushions will help them keep their shape longer, which sometimes can be a weakness of IKEA sofas.
Step Three: Make your buttons. I went ahead and did this while waiting on couch legs before purchasing the sofas. This is a process that is best done while also doing something else like half watching a movie you’ve already seen, listening to music, etc. You’ll likely have to do it in more than one session. My fingers gave out after awhile. You have to push on the buttons pretty hard.
Making the fabric buttons is not difficult. Many places sell a little fabric covered button kit that comes with a template for marking your fabric, the various pieces of the buttons themselves, and a little plastic piece for getting the button to come together. It’s easier to observe the process than explain it. Thankfully, someone has put together a handy dandy You Tube video that shows you exactly how to do it.
I bought my button supplies at the ebay store I Like Big Buttons (terrible name, I know). They were cheap, the transaction was easy, and they were the only ones I could find that would sell the buttons to me in the denominations I wanted. Seventy-five wire shank back buttons size 30 (3/4 inch) and the assembly tool will run you $19.70. Shipping is free. I had a couple of the buttons break on me while sewing them on, but by and large, I had no problems with the product. If you can recruit a button making helper, it’s well worth it to buy an extra assembly tool. I assumed I wouldn’t have anyone who would want to help with the mind-numbing chore. In fact, I had two people who were so interested in what I was doing that they offered to help and probably made at least half my buttons for me.
Step Four: Buy the rest of your tufting supplies. I’m not a great seamstress, but I did have a few tools already on hand. You’ll need a good set of scissors for cutting out the fabric. You can use one of those special disappearing marking pens for tracing the button template, but it’s not necessary. You’ll never see the marked edges, so any marker will do. If you don’t already have a measuring tape and straight pins, you’ll need those as well. I’d suggest your local Hancock Fabrics, Walmart, or similar to buy those if you need them.

You’ll need to order two specialty supplies: a 12 inch upholster’s needle and Golden Nylon Tufting upholstery twine. Hancock Fabrics and several online retailers sell a variety pack of upholstery needles that includes a 12 inch by Dritz. Do Not Buy It. I did, and the needles are worthless. After just one of the thicker seat cushions, my needle was bent in so many directions I had to throw it away. The second time around, I bought the good kind, which was very difficult to find, but they don’t bend. Supamom40 on Ebay sold me three of them for $5 with $2 shipping. The only drawback is they are pointed on both ends. This meant I unintentionally poked myself more than I cared to. If you can find good quality 12 inch upholstery needles that don’t have the double bayonet point, mention it in the comments, and I’ll update the information in the post.
I got the twine at another Ebay seller, Victorian Upholstery. You need about 3 inches for every button set (1 on the front, 1 on the back, connected by the same piece of twine through the cushion). So for one sofa of 32 button pairs, you’d need 96 inches, or 8 feet. They’ll sell you a 100 feet for $3.95 plus $2.85 shipping.
Step Five: Buy your IKEA sofa. If you are fortunate enough to live right next to an IKEA where they’ll do in town delivery, count your blessings. For those of you that live a few hours away, I’ll mention here another little cost saving tip I discovered. I don’t own a truck, and even if I did, you can’t fit two sofas in one. The Karlstad has three separate boxes. We have a friend who let us borrow their truck for the day, and we rented a little Uhaul enclosed trailer. It was $28, and you don’t have to pay mileage on the trailers, so that was all I had to pay. The trailer easily fit both sofas as well as a headboard, a nightstand, and a few other odds and ends we picked up for friends when they heard we were making an IKEA run with a trailer. 🙂 The Karlstad 3-seater sofa with the Sivik dark gray slipcover was $499.
Step Six: Assemble your sofa. Follow the directions IKEA provides for assembling the sofa. This is a two person job, by the way. Just don’t attach their ugly legs. Throw them away, resell them on Ebay, repurpose them for your child’s block set—whatever. You don’t even need the screws/bolts they provide. Hopefully by this time, good ol’ Uncle Bob will have sent you your much more attractive replacement legs. Just screw them right into that hole where the bolt was supposed to go. Bob provides the screw for you. You can ignore the smaller holes that were for the wooden dowels. You won’t need them. Bob’s legs will support your sofa just fine. He even applies those nice pads to the bottom of your legs so that it won’t scratch wood floors.
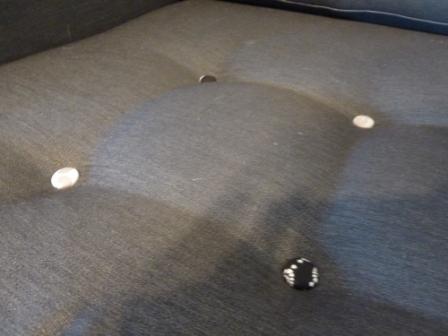
Step Seven: Measure out where you want to place your buttons and mark both sides with the pins. There’s another You Tube video to demonstrate this. There’s no sound describing what they are doing, but you can get the basic gist.
You’re trying to get your buttons equidistant from each other and in the middle of the cushion. It takes a little bit of fiddling, and you have to measure several times. If you want eight buttons on each side like I did, I’ll save you the headache and tell you where to mark your cushions.
For the smaller back cushions, place the tip of your measuring tape on the left hand seam. Stick a pin in at 8 inches, 15, 22, & 29 (7 inches apart). From the top seam, your first row starts 6 inches down, and the second row 6 inches from there, or 12 inches from the top seam. The second row of buttons will also go in at 8, 15, 22, & 29 inches. So, your top left button is 6 inches down, 8 inches from the left. Your bottom right button is 12 inches down from your top seam, 29 inches from your left seam. Stick those straight pins in the eight places you need a button–four on the top row and four on the bottom row. Turn your cushion to the other side and repeat the process.
For the larger bottom cushions, you don’t really want these in the dead center. You want them in what appears to be the center when the back cushions are on. That means you want your eight buttons to start a little lower on the cushion. This didn’t occur to me at first, and I had to remeasure. Again, with your measuring tape on the left seam, as you work across the cushion, you want to stick pins in at 8 inches, 15, 22, & 29. This time your top row is going to be 13.5 inches from the top seam. Your second row is going to be 21.5 inches from the top seam. So your second row of four buttons is going to be 8 inches below your top row of four buttons instead 6 inches like it was on the back cushions. So your top left button is going to be 13.5 inches down, 8 inches from the left. Your bottom right button is 21.5 inches down from your top seam, 29 inches from your left seam. Once again, turn your cushion to the other side and repeat the process.
Step Eight: Tuft those buttons! Figure out what pattern you want your buttons to repeat, if any. I decided since I was using eight different fabrics to make sure I had one of each kind on each side of every cushion. Then I got really anal and decided they need to be in the same place in each cushion. Clearly, not everyone needs that level of symmetry, but if you do, lay everything out and pay attention to what you are doing.
The process will go a little faster if you go ahead and cut 30-inch lengths of your upholstery twine. Grab a pair of needle-nosed pliers, too. Getting the needles through the thick foam of the bottom cushions is difficult at times, and a thimble isn’t going to cut it. I had to grab the needle with the pliers and pull.
Watch this You Tube video on how to tuft a button. They show you how to do the slip knot in slow motion. I still had to watch it several times. Once you figure out the knot, though, it goes fast.
I got asked the question a lot, “How do you make sure the buttons all stay at the same depth on the cushion?” My method was I pulled on the slip knot until I couldn’t get it any tighter, and decided that was the depth it was staying at. To me and anyone else I asked, this always seemed to be at about the same depth. Don’t worry too much. There’s quite a bit of fudge room before you or anyone else will notice a difference.
When you are tufting, you are aiming to poke the needle in one side where you have marked it with a pin, and have it come out the other side where you marked it with a pin. I found on the back cushions this was accomplished easily. They are squishier. The bottom cushions, however, are made out of a thick foam, and there’s not as much wiggle room. If you don’t get the angle just right, in general you have to pull the needle all the way back out and try again.
There were a few things I discovered that made this process easier. First, buy the good needles that don’t bend. Second, use the needle nose pliers to help the needle through the foam. Third, poke both sides of the cushion to sort of give yourself a little pilot hole in each end before you try to get the needle all the way through. Also, don’t bother to thread the needle with the button until you’ve got it in and poking through the other side a little bit. The needle is long enough it will allow you to do that. You can thread it with the button if you like, but while I was fiddling with the needle trying to get it through the foam, my button would usually fall off anyway.
Finally, allow yourself a few centimeters fudge room here and there. There were multiple times the needle would poke out the other side pretty darn close but not exactly where I had marked the button to go. You’ll drive yourself insane if you strive for perfection. If you get within a quarter of an inch, you’re probably fine. In general, I am a perfectionist, but even I decided at some point I was close enough. The only way someone could tell my buttons aren’t perfectly straight is if you got out a measuring tape. The nature of the tufting hides a multitude of sins.
Step Nine: Admire your hard work and count up all the money you saved.
So the total cost to make one Karlstad sofa is:
- $499-sofa & slipcover
- $42-set of Uncle Bob’s replacement legs, including shipping
- $24.50-8 different fabrics for buttons, including shipping
- $19.70-button making kit, free shipping
- $13.80-speciality upholstery needles & twine, including shipping
Grand total: $599
Compare that to Crate and Barrel’s similar Petrie sofa at $1699 or Restoration Hardware’s Churchhill sofa in one of it’s cheaper iterations at $2695!

I contacted a local upholstery shop and they sold me one of the needles they use (with a single pointed tip!) for $12 plus selling me button twine for about a dime a yard. I ended up only saving about a dollar but the supplies are all professional quality plus they support a local business.
I haven’t actually gotten my Karlstad yet but I’m so excited to try this. Thanks for the detailed instructions!!
Thanks for the tip. A single pointed tip needle would be a big improvement. I stuck myself with the other end more times than I would have liked.
Hi Lara, I’m just wondering if you have an update on the tufted sofa. How is it holding up? Thanks!
It’s holding up well. I haven’t had any trouble with loose buttons or anything. It gets heavy use, too. My husband doesn’t just sit on it, he likes to lie the length of it while watching TV.
[…] can only conclude from the raging success of my blog post on how I tufted my sofa that my readers might like more posts on cheapskate DIY home decor. Not to worry, my cheapness […]
[…] out the button spots (more tedious than anything) and learning to tie a slip knot (not too tricky). Here is the tutorial I used again, and the third video she links to has the best info. I didn’t […]
Might be a dumb question, but once you do this you can’t pull the slip covers off to wash anymore correct?
That is correct. You’d have to retuft the cushions all over again if you wanted to remove them. The good news is the covers spot clean pretty well.
Do you like having the seat cushions tufted? I noticed that a bunch of people only tuft the back cushions. I like the look better when they are all tufted, but I’m trying to figure out if there is something I’m missing about having the bottom ones tufted.
Yes and no. I have two couches in the room, and I ended up tufting the seat cushions on one and not the other. I agree that the look of the seat cushions included is great. The reasons not to do it are: 1. It’s a lot harder to do the bottom cushions. The foam is thick, so it took me at least three times as long to do them. 2. If you use the couch a lot, the buttons on the seat cushions become crumb catchers. 3. Once you tuft the cushions, you can’t take the covers off to wash them. The couch I tufted the seat cushions doesn’t see much day to day action. It’s extra seating for when we have guests. The one that I didn’t tuft we sit on every day, so it gets a lot of traffic, and I didn’t want to be sweeping it constantly. Plus, we needed to be able to wash the covers occasionally. I hope that helps you in your decision.
Great tutorial and so imformative. Thank you.
How do you feel about cat hair on the fabric you chose? I was going to get the isunda grey bc I have a long haired persian cAt and I figured the dark denim will show EVERYTHING.
I will be back with my after pics 🙂
I haven’t had a problem, but then my cat is gray tiger stripe and I got the charcoal colored fabric, so it doesn’t show up as much. Either way, the fabric has a little bit of a coating on it, so it helps both in getting up pet hair and stains.
Really grateful for all the time and detail you put into this. Properly informative, and the only proper how-to on DIY tufting I have found on the web. Much appreciated – a big thanks from the UK!