
This is an update to a post I did a few years ago on my food blog. I’ve learned a few things now that I’m not a complete canning newbie. I made another couple dozen jars of jelly over the weekend, sort of on the spur of the moment.
I always mean to plan it better so I can have people over and show them how it’s done. Of my community of friends I only know of one other person who cans, despite several others expressing the desire to learn. It really is pretty simple, but it sounds intimidating, which is why I want to show people first hand it is nothing to be afraid of.
Since once again I was not organized enough to have people over, I took more pictures in hopes people would be brave enough to try it on their own. Here’s proof it’s not too hard.
First off, you will need a little bit of specialized equipment, but not much. You need jars, lids (you can only use them once), a canner with a rack, and a jar funnel (I already had as part of a Kitchen Aid funnel set). If you have a bit of cash to spare, you could also get jar tongs and a lid lifter, but I just used my spring loaded tongs and it worked fine. Plus, I’m not a big fan of unitaskers.
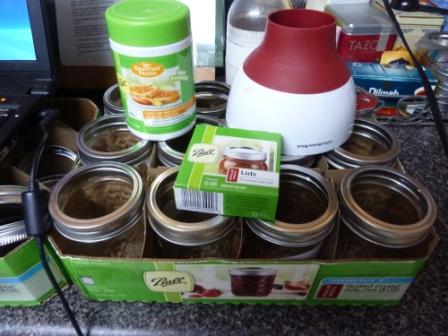
Aside from a canner, all you really need to get started are jars, lids, a canning funnel, and a container of pectin.
For 12, 8 oz Ball jelly jars which came with new lids and even little labels, it was about $8. The canner with rack was $19. Check to make sure there is actually a rack in your canner. I had to look into 4 canners before I found one that still had the rack. Now who steals canning racks out of pots at Walmart, I have no idea. The canning supplies are usually in the kitchen/home goods section.
Step 1: Sanitize your jars. Especially if your jars are new, this is more to get them hot so they don’t shatter when you fill them with boiling jam. You can do this in the dishwasher, but if yours is like mine, this takes forever. You also have to time it so your load is finishing as you’re starting to can so the jars are still warm. It’s actually faster to just boil the jars in a large pot, then hold them in there to keep them warm.

I think it’s easiest to sanitize in a stockpot.
Step 2: Fill a small pot of water and heat it until little bubbles start to form, but not a rolling boil. Turn it off, wait a minute, and then put the lids in. You have to get them hot, but you can’t boil them or the sealing compound might not work right. I accidentally let mine boil at one point and they still worked, but I caught it pretty quickly. Let the lids stay there and keep warm.
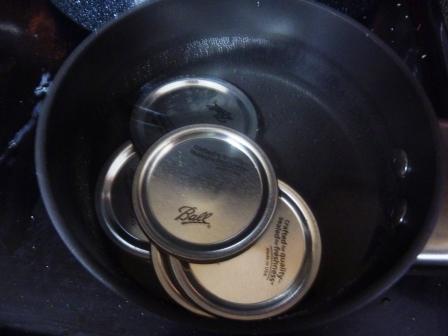
I do the lids in my smallest saucepan. Your stove top can get pretty crowded, so it’s nice that at least one burner not be a space hog.
Step 3: Fill your canner a little over half way with water and set it to boil with the lid on and the rack not in it.
Step 4: Now you actually start working on the jelly part. A word here about pectin. That’s what makes jelly gel. Some fruits have enough natural pectin that you don’t have to add any. I made this rhubarb jam recipe from Allrecipes and because it used orange zest and juice which are high in pectin, you don’t need anything else. It tasted great and gelled just fine with a little additional cooking.
However, a lot of fruits you’d want to make jam out of (strawberries, raspberries, blueberries, peaches, sweet cherries, apricots, nectarines) are low in pectin and need it added for your jam to work. Pectin is normally a ton of sugar. Jam recipes also call for around 4 cups of sugar. That’s also why most jelly you buy in the store is super sweet.
One of the reasons I like making my own jam is I can control the level of sugar. I actually like my jelly to have more of a sweet/tart balance that allows me to taste the fruit, not just sugar. However, because I put in less sugar, I have to use a special pectin designed for low sugar/no sugar jellies to make sure it sets correctly. It also doesn’t add a lot of additional sugar like normal pectin. Ball makes one I like.
I looked at a few recipes before settling on this one. I’ve used it multiple times with several different kinds of fruit. Don’t try to make more than 10 jars at once as your pectin won’t work right. To make 8, 8oz jars of jelly, you need the following ingredients:
6 heaping cups of mashed fruit (this is about 8-10 cups pre-mashing)
7 tablespoons Ball low sugar pectin (a little more than the directions say)
2 cups sugar (you can try more or less depending on how tart you like it)
4 tablespoons lemon juice (optional, but helps the flavor. I tried some with and without, and I like it with
the juice)
1 tablespoon cinnamon (good with stone fruits, but wouldn’t necessarily add to berries)
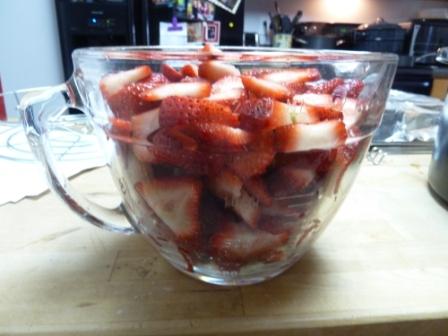
My strawberries pre-mashing. I had over 8 cups in there.
First you clean and cut up whatever fruit you are using and mash it in a batter bowl with a potato masher. You don’t have to completely pulverize it, as some chunks are good, and it will get runnier after you cook it.

My strawberries post-mashing. My 8 plus cups went down to less than 6, so I had to add more.
Once you have your six cups, pour it into a medium sized stockpot, preferably a nonstick one. Even then, jelly is so sticky, it took me awhile to get my pot clean. Next, mix your pectin and 1/4 cup of the sugar together in a small bowl then add it to the fruit.
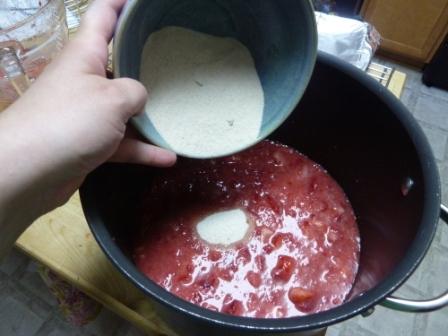
Adding in the pectin and 1/4 cup sugar mixture before cooking.
Place this on the burner and bring to a boil, but keep stirring it. I got distracted once cutting up fruit for my next batch, and it burned up enough of my strawberries that I only got 6 jars instead of 8. Once it reaches a boil, add the rest of your sugar and bring to a boil again and let it boil hard for one minute.
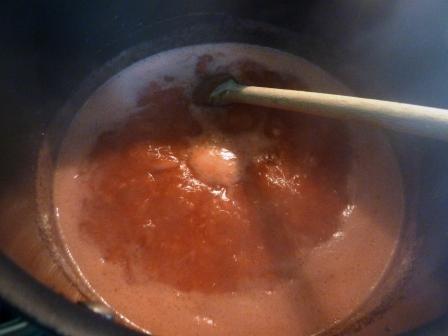
Watch out during the hard boil. There’s a reason my spoon is so long here. I’m trying to keep my distance from that very hot liquid that kept trying to jump up and burn me.
At this point, you need to test to see if it is jelling how you like. Stick a teaspoon in the jelly, scooping up just a little bit. Blow on it until it cools. My firmed up nicely, and I tasted to see if the sweetener was right, too. If it’s not sweet enough or needs more pectin, add a bit more now. If all is good, move on to the next step.
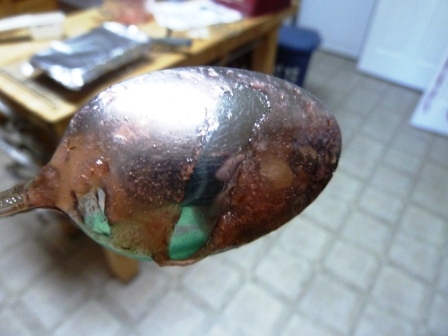
If it’s gelling good, when you run a finger through the goop on the spoon it will leave a trail.
Step 5: Pour into jars. Turn the heat off on your stockpot. Get a few jars out of your pot/dishwasher, and set them near the stockpot.

Carefully pour any water out of the jar as you remove it with the tongs.
Put your jar funnel in the first jar, and ladle the hot jelly into it up to within 1/4 inch of the top of the jar. This is basically where my funnel stops, so I just filled it to the funnel. If you notice any air bubbles, you can pop them with a little spatula by running it around the sides. You also can skim off any foam that might have formed for a prettier jar of jelly, but it doesn’t taste bad.
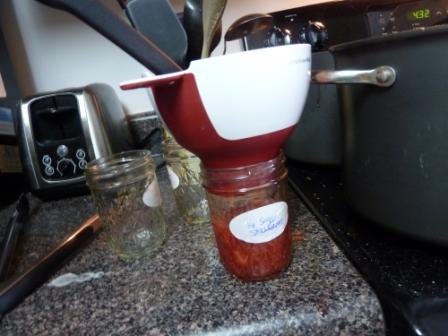
Just pour to where your funnel ends. You don’t want to overfill the jars or they won’t seal right.
Then using your tongs or lid lifter, pick up one lid from the hot water.
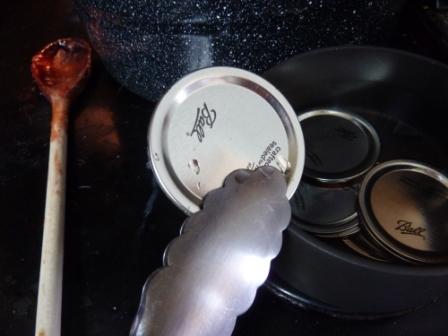
Place it on the jar and then screw on the lid so it’s on, but don’t go crazy tight with it. If you have a little bit of jelly left, but not enough to fill a jar, just put it in a tupperware in the fridge and it will stay good for about 3 weeks.

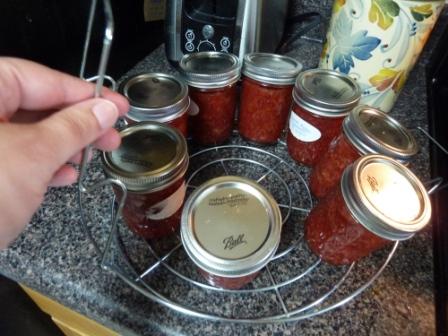
Jars with the lids on, but the rings aren’t screwed on yet.
Step 6: Once you’ve got all your lids on, place your jars in the canning rack and lower it into the boiling water of the canner.
The jars will probably wobble around and maybe even fall over, but it’s not a big deal.
Make sure the water covers your jars by about 2 inches. Boil it for 5 minutes, then take the jars out by lifting up the rack. You’ll start to hear little pop, pops as the jars start to seal themselves.
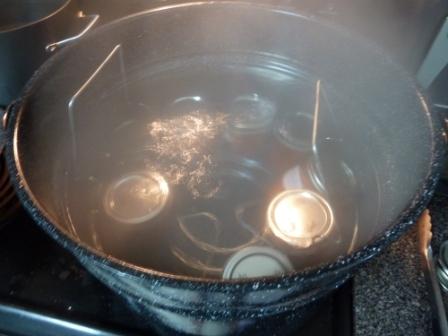
Make sure you use potholders to raise and lower the rack in the canner so you don’t burn your hands. Also, for handling the jars right after. They’re hot!
Wipe any excess water off, and let them cool on a towel, so they don’t cool so fast that they crack. Sometimes you can get the jars to seal without this last step, but you’re more likely to get a few duds (lids that pop up and down when you press a finger on them) that didn’t seal and you have to eat right away. Also, the processing helps reduce spoilage and gives longer shelf life. It’s one of the easiest steps, so I’m not sure why some people skip it.
Let them set for about a day, and recheck the lids to make sure they sealed properly. Then label and store your jam. Labeling on the side of the jar is nice for giving it away as a gift. However, those labels are difficult to get off. For your own use and reuse of the jars, it’s easier to just label the lids with a Sharpie since you only use the lids once anyway.
I was pleasantly surprised how easy it was. It does have several steps, but once you get it all set up, you can make back to back batches. I made 24 jars of jelly in about 3 hours, and that was my first time.
A lot of people are real purists and only use fruit from the farmer’s market or that they picked themselves. For my first batch I used California strawberries from Costco. You can call me a fruit heretic, but they tasted better than the ones I got at the Durham Farmers Market, and were a heck of a lot cheaper.
The second batch I used apricots I got at Costco again. Once I mashed them all up, I didn’t quite have 6 cups, so I added some cut up mango I had leftover from I trifle I made the day before, and some cinnamon. It was very tasty.
The last batch I really threw in everything but the kitchen sink. I had about 2 cups of strawberries left, then I threw in a pint of blueberries I had in the freezer, and the last third of a bag of frozen triple berry blend (raspberries, blueberries, and marionberries) from Costco. I defrosted all the frozen fruit before I mashed it up. I still didn’t have quite enough fruit, so I defrosted a package of blackberry pulp I get at my Latino grocery store and use to make blackberry iced tea. After I threw that in, I was still short about a cup, so I picked all the strawberries out of another bag of frozen mixed fruit that I bought a while back to make smoothies. All this together made a 5 berry jelly that actually tasted the best of the bunch!
I have to say, I felt very proud of myself looking at all my gleaming jars of jelly cooling on my dryer. Try it for yourself!
