Win a Free Copy of Call of Affliction

You may have noticed on the right hand side of the webpage a link to sign up for my Author Newsletter. I wanted to explain what this is and isn’t. This mailing list is the way I will use in the future to first announce upcoming books, as well as fun giveaways, and even offer opportunities to read the book before it even comes out. It’s not something where I’ll spam you constantly. If I don’t have a project coming up, you won’t hear from me, and even then, I’ll try to get all the pertinent information in one or two emails. Secondly, I won’t ever give this information to anyone else. Also, I don’t ask for much: just your first name and email address.

Plus, if you sign up for the Newsletter mailing list before Thanksgiving, you’ll be entered into a giveaway to get a free copy of Call of Affliction. I’ll be giving away two paperback copies and five Kindle copies of the book. Even if you don’t have a Kindle (I don’t, much to my chagrin.), you can read ebooks on their ap for computers and smartphones.

You can sign up here or at my Facebook page. Speaking of which, if you haven’t already, check out my Facebook Author page. Feel free to Like it while you’re there 🙂

So, sign up and good luck!

Book Title Revealed

If any of you have had the misfortune of asking me what my book was about sometime in the early stages, you probably were subjected to at least a twenty minute discussion that began with, “Well, it’s complicated. . .” An elevator pitch it was not.

As it evolved from original idea to first draft to second draft and the many drafts in between, it changed. Since it was my first novel (I don’t really count the couple I wrote in high school), I was learning how to craft a story, develop characters, and get my theme ideas into a plot. We’ll not even discuss all the titles I tried and rejected. Plus, it became obvious pretty quickly that what I had was not one book, but a series. I didn’t just have to figure out how things would unfold in the right order for one book, but six. Oh, and I had to figure out it would take six books.

Just to make things that much harder on myself, I didn’t start with an idea at all, but a picture. I read a lot of fantasy, and I came across this painting by Viktor Vasnetnov. I don’t even remember how. I was just so struck by it, I had to know what the creature was, and what was the story behind it.

Gamaun

This lead me to the Russian folktale of the Gamayun—a half bird, half woman prophet. There were other characters involved, and as I continued to get ideas, I just kept going back to Russian religious myths to find a wealth of ideas for villains, conflicts, etc. My brain was whirring. I didn’t just want to retell the old stories, though. I wanted to put them in a modern setting and tell them in a different way.

Which leads us to today, where I am happy to say I can tell you exactly what my book is about and even the title. It looks like the release date will be in late November. I’ll let you know the exact date soon. But be looking for. . .

CALL OF AFFLICTION

Book One of The Gamayun Prophecies

Galine Karsavina’s life has always been difficult, but it’s about to get much worse. She already had enough responsibility as both a nursing assistant and her sister Katja’s guardian. But when an embittered and mysterious patient dies in her arms, Galine’s eyes are opened to a mythical world few ever see. With the stranger’s last breath, Galine is transformed into a half woman, half bird creature covered in flame-colored feathers. She has been chosen as the next Gamayun and is forced to be a prophet for a God she doesn’t believe exists.

The world of the Gamayun holds only danger for Galine. Forced to shift into her half bird form, she is sent with prophetic warnings to her darker counterpart the Sirin. Oozing seduction and violence and aided by her legions of demon hawks, Sirin is determined to silence Galine by any means. Galine struggles to stay alive and keep her sister and best friend Harper safe, even if it means lying to them about who she really is. Her only ally is Sasha, the guardian of the previous Gamayun. Galine is drawn to him, but he might be safer without her.

Navigating No More

For the last couple of years, you might have noticed that the tagline for my blog has been, “In Progress: A New Author Navigates the World of Publishing.” I was never given a map, so my journey has taken a while and looked something like those maps from the comics I never found funny as a kid:

family circus

It’s even less funny when you’re the one wandering around. As you might have noticed, while I have still been plugging away at the food blog, I’ve been pretty silent over here. I have been working on a number of things, but one of the lessons I learned in the past year is getting published involves a lot of waiting.

Around about a year ago, I started sending out letters to agents to try to get my first novel published in the fantasy genre. After about 6-8 months of the slow back and forth of waiting to hear, writing more people, getting rejections or manuscript requests, waiting to hear back again, etc. I started to see a pattern. I was getting a lot of letters along the lines of, “We like what we read, but it just doesn’t fit with what I’m looking for.”

I knew already that I had a bit of a genre bending novel, and I had already had one surprise when I realized I had not written a young adult novel. So, I went back and did some more research again, and found out I had written a paranormal romance or perhaps urban fantasy, not straight fantasy. At that point, I had to reconsider my whole strategy. I’ve written here before that often self publishing is still not the way to go for most authors. The one exception to this rule is if you are writing anything in the romance genre.

Now finding that I had written a paranormal romance, instead of starting the process of finding an agent all over again with a romance agent, I decided to strike it out on my own with self publishing. It had taken me the better part of a year to figure out how to navigate the traditional publishing process. Self publishing is a different arena entirely. Thankfully, a very dear friend self publishes in the romance genre, and she has very patiently tutored me in the process.

All of this to say, I have not been idle while I haven’t been blogging. In fact, it is just the opposite. I have been trying to devote the time to getting an actual book out faster. As you will note, my tagline has changed. My navigating days are coming to a close, and the publishing is about to begin.

Stay tuned!

House Swapping: FAQs

I know I promised the next post would be about the best websites for swapping, but before we get into the nitty gritty of logistics, I realized there are still a lot of questions about swapping itself I haven’t answered. While I’ve listed the pros and cons of home exchange, there’s more to consider before you start planning a swap.

Does a Home Exchange cost anything? In my previous post I talked about the cost savings of doing a swap instead of a normal vacation. The exchange process itself can be free, or it can cost up to a few hundred dollars. It depends on whether you use a free website or one that charges a fee to belong to it. Some of the websites that charge offer some services for the fee, but most don’t really offer anything above and beyond the free websites. So why do they do it? It ensures that the people listed on the site have some skin in the game and are serious about swapping. Sometimes these sites will also do background checks on its members. This gives some swappers piece of mind.

Being cheap, I have only used the free sites. I haven’t worried about someone trying to pull a long con, because it’s a lot of work for no monetary gain. Money doesn’t exchange hands, you’re exchanging houses. Plus, your exchange partner has to buy an expensive plane ticket to get to your house.   The biggest risk is that your partner will cancel after you’ve already bought a ticket. This does happen, but as you are arranging details in the months before you leave, you can tell if someone is flaky or not pretty quickly. Don’t do a last minute swap or buy a ticket before all the details are worked out, and you should be fine. Do buy travel insurance, though. Our New Zealand swap fell through because our partner contracted terminal cancer. He was very apologetic and even tried to figure out if maybe we could stay with some friends. We were still several months out so were able to make other arrangements. Sometimes something beyond your control will happen, but paying $200 to a website wouldn’t have helped in that case.

Do you have to have a house, or can you live in an apartment? What if you are renting? You certainly do not have to have a house. You also don’t have to exchange house for house or apartment for apartment. We have a four bedroom house and have happily exchanged it for one bedroom apartments more than once. You just have to have a partner who is willing to exchange what they live in for what you live in. Mostly it’s about getting to the location you want.

If you rent your home, that doesn’t mean you can’t swap it, either. It is best to check with your landlord to make sure it is okay, but we have swapped with more than one person who did not own their apartment.

Can you swap if you have a roommate or pets? This is another situation that you can work out with your swapping partners. We have had both roommates and cats. Sometimes having a roommate still in the house, especially a hospitable one, can be wonderful. They can be extremely helpful to your swapping partner as they navigate both your house and a new country. However, some people want the house to themselves, and our roommates have had flexible enough schedules that they either went traveling with us or went traveling elsewhere while our swapping partners were in the house. Other times we’ve seen a break between roommates as a great time to go swapping.

As for our cats, sometimes your partner wants or needs to do a pet exchange as well. We came close with our Aussies partners. They had a dog, and for awhile we had decided to just watch each other’s pets. Then they got rid of their dog, so we decided to have our parents watch the cat, but it can go either way. It’s just another logistic to work out.

What if I live in the middle of nowhere? Is anyone really going to want to swap with me? You’d be surprised. We live in Durham, NC. While I love the city, and it’s a great city to live in, it’s not exactly a tourist destination. It is becoming something of a foodie destination, but still, it’s more of a weekend trip, not someplace you’d like to spend a month or more. I regularly turn down requests to swap from the UK, Australia, Argentina, Spain, you name it. Why? Most people just want to get to the United States, and we offer a car, and they know they can explore from Durham. Our house is actually a pretty good swap because we are centrally located on the East Coast. In one hard day of driving they could be in New York City or Disney World. We’re just four hours from Washington, D.C., two hours from the Atlantic Ocean beaches, four hours from the Blue Ridge mountains—you get the idea.

Plus, you never know what motivates people. One of our swaps happened because they wanted to go somewhere in the US, and the teenage son really wanted it to be North Carolina because his favorite professional wrestler was from North Carolina. Likewise, we have taken swaps in Nuevo Portil, Spain, Vetheuil, France, and Hervey Bay, Australia. What, you’ve never heard of these places? Yeah, people who live in those countries haven’t heard of those places. They are all very small cities or maybe not even a hamlet, but they got us in the vicinity of where we wanted to go, and the car we swapped got us the rest of the way. What’s even more surprising is we adored our little no name towns. We wouldn’t ever have picked them on purpose. We didn’t know they existed! Vetheuil was so charming it made your teeth hurt, and we get honest to goodness homesick for Nuevo Portil.

What kinds of exchanges are there? The most common kind is a simultaneous exchange. That means that you are in their house at the same time they are in yours. There are also non-simultaneous exchanges, though. This can occur if one or both of you have more than one house. Our, it has happened a couple of times where the person we were swapping with went and stayed with a partner at their place of residence. It can also happen if you are taking a multi-stop trip where part of the time you are staying in hotels and part of it you are swapping. So our Aussies wanted to stay longer in the US than we wanted to stay in Australia. Plus, our NZ swap had fallen through. So, while the Aussies were still in our house, we left their house earlier and spent a month touring NZ and staying at hostels. You can also do an exchange of hospitality. In this instance, you agree to host your swapping partner as a guest and then they host you as a guest. Obviously, it has it’s pros and cons, but sometimes this arrangement can work well.  You can also arrange your exchanges so they are back to back.  This can be a little tricky, but this means you can visit more than one place in the same trip.  For example, when we went to Europe, we had back to back swaps in Italy, Spain, and France allowing us to visit not only those three countries, but a couple quick trips into Portugal and one day trip to Morocco.

What about insurance, and who pays for what? There are several kinds to think about here, so I’ll try to address each one.

Home: You keep paying your home owners insurance and they pay theirs. If anything happens to your stuff while you are gone, it should be covered just fine. However, most home owner’s insurance policies will not cover any property of your swapping partner’s that might get damaged or stolen while they are staying in your home. Because of this, your partner should look into travel insurance or even renter’s insurance while they are here (depends on how long and what the travel insurance covers) if they want to make sure their stuff is covered in your house. You should do likewise to insure your belongings in their house.

Health: Again, everybody keeps paying their own policies, but it’s worth it to look into travel health policies. Not only is it highly likely that your insurance won’t cover anything out of country, but most other countries have socialized medicine. That means it’s free or very cheap to the countries’ residents but you’ll have to pay full price. Travel health policies are separate from travel insurance. There are some very affordable ones and very worth it. We’ve had to use it before, and it saved us thousands of dollars.

Car: If you are swapping cars, this will come into play. Again, both parties should just keep paying for their respective policies. However, you do need to inform your insurance carrier that other people will be driving your car. Usually the insurance companies need a bit more information and maybe a copy of a driver’s license. You’ll likely be asked for the same thing, and it varies by country what you have to provide. Rarely do you have to pay extra, but sometimes there is a fee to add drivers to your policy. You will also have to get an international drivers license. This is basically just a document that translates your current driver’s license into multiple languages. I’ll explain more details on that in an upcoming post.

Travel: You’ll be offered it when you buy your plane tickets, and you can buy more robust policies as well. At least get it on your tickets. Some credit cards automatically give you some travel insurance when you book cars, hotel rooms, etc. Either way, look into policies and get at least some basic coverage for your large purchases. I’m not the kind of person who believes in extended warranties and other various things that just gobble up your money. As stated many times, I’m cheap. However, I’ve traveled enough to know things just go wrong . One thing I’m a big believer in is insurance. You don’t necessarily have to get the gold-plated version, but get something.

Those are the questions I get most often, but if you have others, add them in the comments and I’ll try to answer them. In the next few posts, I’ll try to address the steps in planning a swap.

House Swapping 101: Is a Home Exchange Right for You?

Two facts about me: I love to travel, and I am so cheap you’d think I lived through the Depression. International travel is expensive enough, you would think these two facets of my personality would cancel each other out, and I’d never go anywhere. Not so. I am also stubborn, so my cheapness only spurs me on to creativity.

In my search for an affordable way to see the world, I discovered house swapping. The basic concept is you go live in someone else’s home while they come live in yours. The execution is a great deal more complicated, but that’s the gist of it. If you’d like to see it played out on screen, you can rent The Holiday with Jude Law and Kate Winslet. There’s a delightful scene involving napkins, but it’s not particularly informative about the process. I also can’t guarantee that you’ll fall in love with anyone while on vacation.

The-Holiday-DVD-cover
So How Does it Work?

Exchanges are facilitated via house swapping websites. There are many out there, and I’ll have a separate post on how to choose the best one for your needs. Listings are similar to classifieds. You upload pictures of your house and neighborhood and perhaps some nearby attractions. Like if you were listing your property for sale, you mention how many bedrooms and bathrooms, square footage, and generally emphasize the positives. If you live in a city and are close to public transportation, let it be known. If you are fortunate enough to live near the beach, tell them that, too. In addition to information about your home, you’ll also provide information about where you’d like to travel. You can be as specific as you like stating “Only Barcelona, Spain,” or “We’re open; Make us an offer.”

Once you have active listing(s), you can start emailing properties in countries or cities that appeal to you. While this is most often used for international travel, you can do domestic swaps as well. This part of the process can take awhile. Depending on how flexible you are on destination and dates, it can take a lot of emails to find a swapping partner. When we went to Queensland, Australia, it only took one email because they found us. When we went to New Zealand, it took 200 emails.

Here's a partial listing for a home in Galway, Ireland from one of the largest swapping sites, HomeExchange.com.

Here’s a partial listing for a home in Galway, Ireland from one of the largest swapping sites, HomeExchange.com.

What’s the Benefit of Swapping?

The biggest benefit is cost savings. When traveling internationally, the items that are the most costly are plane tickets, lodging, transportation in country, and eating out. With house swapping, you eliminate the lodging cost and may greatly reduce the last two categories as well. At least half of our exchanges have also included a car exchange. We drove their car(s) while they drove ours. We both had to pay for fuel costs, but that was still considerably less than if we had to pay for rental cars or train passes. Having a home base instead of a hotel room also means access to a real kitchen. We still sampled the local cuisine from time to time, but we weren’t forced to eat out every meal. It was also fun cultural experience to shop and cook with the local ingredients.

The house we stayed at came complete with cooking magazines.  Aussies are nuts about meat pies and puff pastry is cheap and available in every grocery store.  I had loads of fun trying out this meat pie recipe, which was delicious.

The house we stayed at came complete with cooking magazines. Aussies are nuts about meat pies and puff pastry is cheap and available in every grocery store. I had loads of fun trying out this meat pie recipe, which was delicious.

You also get a much more realistic experience of the country. We have traveled where we stayed only in hotels or hostels interacting only with other foreign visitors and only visiting the major tourist destinations. With swapping, you stay in neighborhoods with the locals, shop with the locals, and stumble upon hidden treasures you never find in a guide book. Also, over the months of planning the swap, you get to know your swapping partner pretty well. They can also guide you to sites and experiences you wouldn’t otherwise know about.

Now this depends on your work schedule, but because swapping allows your money to stretch further, you also open up the possibility of longer stays. Often your swapping partner will want a longer stay, too. Only in the United States do we feel two weeks in an adequate vacation time. We have found people who will do less than a month, but expect most exchange partners to want at least three weeks. Our Australians wanted six months.

Perhaps you love going a hundred miles an hour all day sight-seeing and then want to go to the local clubs after. Maybe you like hotel rooms with maid service and the tiny shampoo bottles. I, however, am a homebody that likes peace and quiet after a long day exploring. I find one of the best parts of swapping is coming home to a home. I crawl into a bed that has become familiar, drink tea out of the same mug, and don’t hear any fellow tourists partying into the wee hours.

What Are the Drawbacks of Swapping?

First and foremost, they require a lot of planning. There are many details to work out between you and your exchange partner. Also, because you aren’t doing the normal tourist thing, you often have additional planning. You might be staying a little bit further away from the major sites because that’s where you found a swap, so that requires extra planning and research on how to get from where you are staying to where you want to go. Because you are doing your own cooking, you might be packing meals and taking time out for grocery shopping. You have to locate and navigate a grocery store. When you fly in, there’s no hotel shuttle picking you up, so you have to arrange a way to get to where your swap is. If you are staying longer than the normal visitor, there might be visas to look into. None of these are insurmountable, and I’ll be doing a post that helps you consider these extra details. Still, if you prefer the sort of vacation that is preplanned and prepackaged and all you have to do is show up, then swapping is not for you.

An excerpt from a blog post my husband did on how to get from the tiny town of Vetheuil to Charles DeGaulle Airport in Paris using only public transportation and hauling 50 pounds of luggage.  This took him so much planning and research, he posted the entire process in the small hope it might be useful to someone.

An excerpt from a blog post my husband did on how to get from the tiny town of Vetheuil to Charles DeGaulle Airport in Paris using only public transportation and hauling 50 pounds of luggage. This took him so much planning and research, he posted the entire process in the small hope it might be useful to someone.

If you are really particular about your possessions and privacy, the whole idea of this might freak you out. We have a cat who still has her claws, which dictates that it’s best if we don’t own nice things. When at any moment what you own could be shredded or have a hairball coughed up on it, you learn to hold things loosely. House swapping does have some built in protection, though. True, your exchange partner could be trashing your house, but they are also aware that at that very minute you could be trashing theirs. It tends to keep people polite.

That said, we usually put sensitive and hard to replace documents (birth certificate, SS Card, etc.) in a small box along with the one piece of nice jewelry I own, and give it to a trusted friend for safe keeping while we are gone. Not that I’ve ever suspected the people we would swap with would ever do anything with them, but it gives you piece of mind that those things are secure while you are gone. Likewise, we have come across locked closets, drawers, and even garages in our swaps that I suspect were serving a similar purpose.

The biggest drawback, though, is when things go wrong, you have to deal with it. On any trip, there’s a chance something unforeseen could happen, but usually if you are doing the normal tourist thing, there’s someone else to call to take care of it. For example, in Spain a gust of wind from the window knocked over a lamp and broke it. If we were in a hotel, we’d just call the front desk, explain, and be done. Because it was in someone’s home, we had to replace it. It turned out to be easy because we were shopping at the local stores, and I spied the same exact lamp.

Sometimes, though, the problem is not so easily solved. When we were driving in northern Queensland, we hit a kangaroo. They’re like deer up there, a pest that just runs into the road without warning. If we had been driving a rental car, the company would retrieved us, given us a new car, and our credit card offers us rental car insurance, so we wouldn’t even have had to pay for the damage. Instead, we had to locate a tow truck, get back to the nearest town, and pay for a hotel for three days while the insurance got worked out. Then we had to rent a car to drive back to our swap, pay the $500 deductible on the car insurance, and wait a month for the car to be fixed because it takes so long for parts to be shipped to Australia. In the meantime, we couldn’t drive anywhere without paying for another rental car. It still likely cost us less than renting a car for the four months we were there, but it was a lot to deal with.

Up Next: The best websites to look for exchanges

How to Make A Drum Lampshade

finished shade

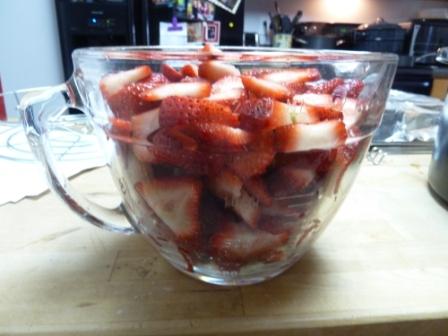
Why are lampshades so boring?  When redecorating my living room, I searched high and low for lampshades with some character.  I found one I liked at Anthropologie, but after they were unable to provide me with more than one that didn’t have a design flaw (don’t even get me started!), I was back to the drawing board.

Like almost everything else in my living room project, I finally came to the conclusion I was going to have to make it myself.  I guess my tastes are just too weird to run with the current decor trends.

Thankfully, I found out that lampshades are not horribly difficult to make.  Much like with my couch tufting, the hardest part is tracking down the materials and all the necessary tutorials.  Since my couch DIY was so helpful, I thought I’d once again type up all the gory details for those interested.

What You Need To Buy

1.  Lamp Base:  You’re welcome to use one you already own, but you need to have it in hand.  It’s important to know how big your lamp base is, what it looks like, what kind of fittings it uses, etc.  You can’t order your parts to make the shade until you know what the shade is going on.  I find most lamp bases in stores currently to be just as dull as the lampshades.  Any that are interesting tend to be overpriced.

mercury glass lamp

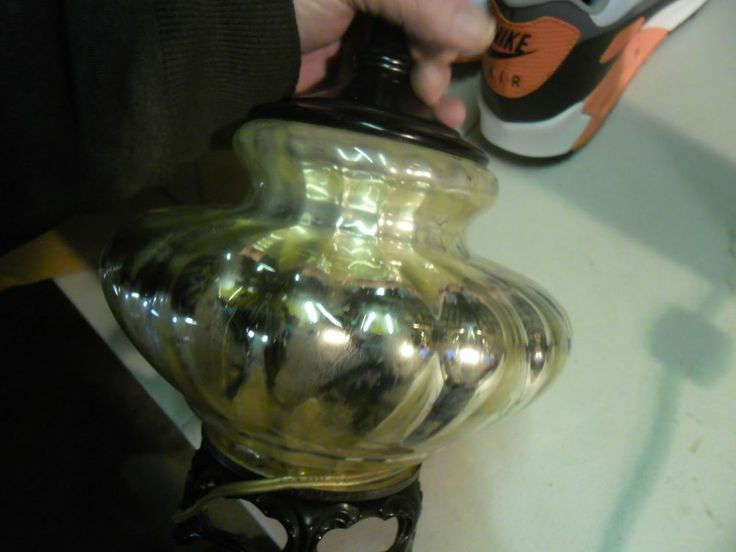
I bought this working antique mercury glass lamp off of Ebay for less than $30 including shipping.  Ebay has tons of cheap antique lamps, many of them still in good working condition.  Even if they they aren’t working, you can rewire them with a lamp kit from Home Depot for $12.  I got this lovely milkglass base for another project for a mere $15.

milkglass lamp

2.  Fabric:  There aren’t many limitations on what kind of fabric you can pick, which is the beauty of making your own lampshade.  The special paper you have to use for the inside of the shade doesn’t stick very well to synthetic fabrics, so stick to natural fabrics like cotton and linen.  It’s also best to use a lightweight fabric because if it’s too thick, the light might not shine through well.  Still, there are thousands of lightweight cotton fabrics out there.  Go crazy.

look at your pattern

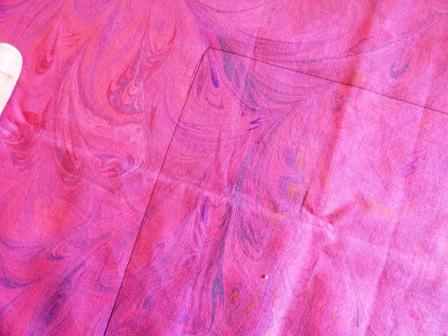
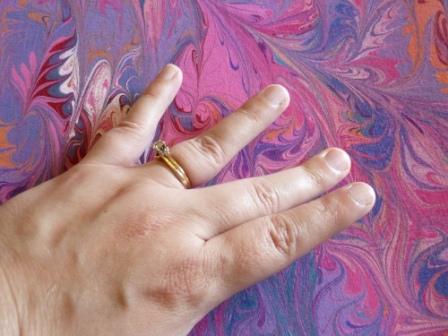
If you are wondering where I got my fabric, it’s a hand marbled fabric I bought from an artist in Oregon named Marjorie Lee Bevis.  She was very easy to work with, answering a few questions I had, and even sending me pictures of a couple different samples.  It’s even more stunning in person.  She sells lots of different colors at her website MarbledFabrics.com.

Unless you’re making a really large shade, a yard of fabric is probably going to be enough.  In the Directions section, I detail exactly how to measure how much you need.  If you’re worried, do your calculations before you buy your fabric.  My fabric was $42/yd, so I made sure.

3.  Lamp Rings & Maybe Some Parts to Make Them Work: So, first thing, decide how wide (diameter) a lamp shade you want.  I wasn’t entirely sure, so I tried a few different lamp shades from other lamps around my house with the base I was going to use.  I liked the look of a shade that was 12 inches in diameter, so that’s what I went with.

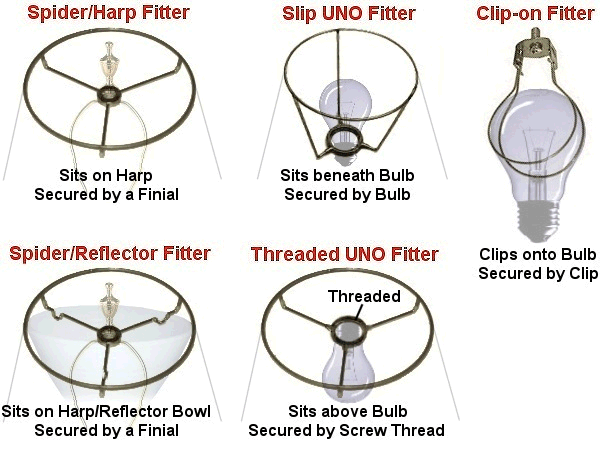
Almost all of our lamp parts will come from The Lamp Shop.  You need to order two lamp rings, one plain bottom ring, and one top one that works with your fitting.  This is where you need to look at your lamp base.  See what type of fitting it uses so you know what kind of lamp ring to get.  Here’s a graphic of the most common types.

fitters

Scenario 1:  You have a harp or a harp/reflector bowl fitting and a finial you want to use that came with your base.  Great!  You just need to order a top ring for a spider fitter, which is called a washer top just to be confusing.  It should be the same diameter as your bottom ring.

Scenario 2:  You have the bottom remains of a harp, but are missing the harp and/or the finial.  This was my problem.  You can get a replacement harp and finials at The Lamp Shop, too.  Amazon also has a selection.  Get your washer top ring, too.

Scenario 3:  You got nothin’ but a place to screw in a light bulb.  Don’t panic, we can work with this.  You can do one of three things.  The most sturdy fitting is the harp/spider, so you can order a harp base in addition to the harp, finial, & washer top from the previous scenarios.  As they are a whopping 28 cents, this is not much of an additional hardship.  You could also buy a UNO top ring, but as I didn’t use one, I can’t tell you how to measure what size you would need. If you’re replacing an old UNO shade, measuring it would be a good place to start, though.  You could also buy a clip on fitter with a washer top ring and finial, but they slide around and have a hard time clipping to corkscrew fluorescents, so I wouldn’t recommend them, either.  However, sometimes with certain lamps you just can’t put a harp base on and they’re your only choice.

Pressure Sensitive Styrene:  This is the magic lamp making stuff.  It’s the slick, plastic-like coating that is on the inside of all lampshades that protects the fabric from the heat of the lightbulb.  The Lamp Shop sells it by the foot or yard, and it has an adhesive backing on it.  You just peel the paper back off and stick it straight to your fabric, easy-peasy.

Glue:  The Lampshop sells the quick drying glue you need already pre-loaded in an applicator bottle.  I wasn’t sure if that amount would be enough for my project, but I risked it.  It was more than enough.  I could easily make another shade with what is left.

Bulldog or Binder Clips:  The tutorials suggest using bulldog clips, which you can buy at the Lamp Shop or an office supply store.  However, unless you’re dying to own a box of bulldog clips, this could be one of the pricier parts of the project at $15.  I found basic office binder clips I had lying around in various sizes worked fine.  Plus, if you need to buy them, a box of small binder clips (the size that worked best) runs you $1.19 at Office Depot.

Items You May Need to Buy Depending on How You Finish Your Shade

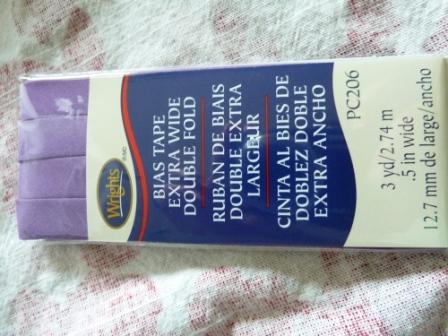
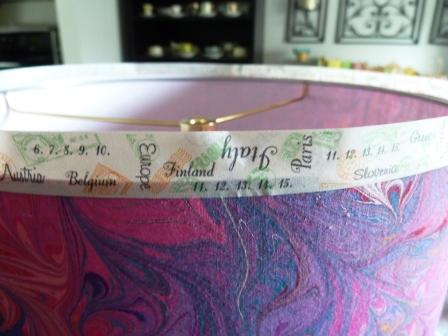
You can finish out your shade in two ways.  I chose to put a bias tape trim on mine.  That’s what that plain purple strip of fabric is on the bottom and top of the shade.

finished shade

You can also make a basic looking shade where you just have one kind of fabric without any trim, like this blue shade:

basic lamp shadeIf you want to make a lamp with the bias tape trim, you’ll also need to buy:

Paper tape by the yard from the Lamp Shop, and make sure you buy enough, because I couldn’t find this in any craft store.  3/4 inch is the size you want.

Trim of Your Choice:  You can use ribbon instead of bias tape if you like, but double fold bias tape was easy.  You can either make your own bias tape, if you want it to be the same fabric you used for the shade, or you can buy premade bias tape.  I bought the premade stuff. Not only is it cheap (around $4 at Hancock Fabrics), it comes in many colors, and I liked the look of the solid color contrasting with my pattern.

bias tape

Plus, while making bias tape isn’t difficult, it’s one more step, and it does require a sewing machine.  If you feel up to the task, though, there’s a great video tutorial how to do it here.

If you want to make a basic lamp without trim, it’s helpful if you buy this molding wand from the Lamp Shop.  It helps you tuck the fabric up under the rings.

burnishing tool

Other Tools to Have On Hand, but You’ll Likely Already Own

  • A yardstick or measuring tape
  • Pen, pencil, chalk–something to mark your fabric & styrene with
  • Scissors or rotary cutting tool and mat
  • A couple heavy books

Directions

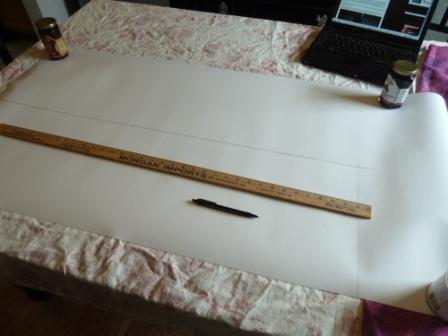
1.  First things first, you need to finalize the exact dimensions of this shade.  If you have your lamp base, and you’ve tried other shades from around your house with it, then you hopefully have a good idea now how big a shade you want.  You need to decide two things, the diameter (how wide across the shade should be) and how tall you want it to be.  This is a drum shade, which means there’s no slant to it.  It will be straight up and down.

Just to be all equal like, I decided I wanted a shade 12 inches in diameter and 12 inches tall.  That’s kind of a tall shade, but I really liked my fabric, so I wanted to see more of it.

Once you have those measurements, keep them handy, because you’re going to need them multiple times.

2.  Calculate how much pressure sensitive styrene you need.  Okay, folks, we have to use the MATH here, with Pi (3.1416) no less.  Get a calculator.

measuring lamp paper

The piece of styrene you cut out is going to be a rectangle.  The height of the rectangle is the height of your shade.  To find the width of the rectangle, we have to do some weird circle math and figure out how much styrene we need to wrap completely around the shade.  To do this, you have to multiply the diameter you chose (for me it was 12 inches) by Pi.  So:

12 inches x pi (3.1416) = 37.6992

Next, so we have a little fudge room with the styrene, add a half an inch to your total:

37.6992 + .5 = 38.1992

Finally, round up to the nearest half inch so we don’t have to mess with all those decimal points.

38.5 inches

Okey dokey, 38.5 inches is the width of the rectangle of styrene you need to cut out. The height is the height of your lampshade.  For me, once again that was 12 inches.

So, I needed to measure out and cut a piece of styrene that was 12 inches by 38.5 inches.

If your styrene keeps curling up on you, just grab some jars or cans from your pantry to weigh down the corner.

3.  Cut out the styrene.  Use scissors or a rotary cutter, whichever you have/prefer.

4.  Lay out your fabric and decide which exact piece of it you want to be the shade.  That piece of styrene you just cut is the exact dimensions of your shade.  Place it over sections of the fabric to help give you an idea of how big a piece of fabric you are working with.  If you’re using a solid piece of fabric, this step is unnecessary, but if it has a pattern, especially like mine, where the pattern never exactly repeated, you want to choose the part of the fabric that’s your favorite.

trace around 1

Once you decide where that spot is, lay your piece of styrene on top of it, and trace around it.  If your pattern has stripes or other elements you want to keep straight, use your yardstick to help you with alignment.

trace around 2

5.  Depending on how you wanted to trim your lamp (no trim vs. bias tape) this is where things begin to diverge.  If you opted for no trim, then you need to measure and mark a second line a half inch out from the edge of the styrene all away around it.  That’s the line you’ll use to cut your fabric out, but don’t cut it yet! You need extra fabric hanging off in every direction from the styrene.  You should also watch this Martha Stewart video, as that’s the kind of lampshade  she makes.

Since I decided to finish my lamp with the bias tape trim, all the pictures from here on out will reflect that method, which is why I refer the others to the Martha Stewart video.  If you opted for the trim finishing method, you don’t need to make that second measure line.  Once you’ve traced around your styrene, you’re set.

6.  Remove a few inches of the paper backing to expose the adhesive on the styrene.  Use those tracing lines you just made as a guide to keep it straight, and slowly stick down your styrene to your fabric. Smooth out lines and air bubbles as best you can as you go.

beginning the stick down process

Don’t get scared by this step, the styrene is pretty easy to work with.  Before you know it, you’ll have all of it stuck down.

all of it stuck downOnce you have it all stuck, flip it over and double check for any little bubbles or anything that might need some extra smoothing.  I had a few here and there.

smooth air bubbles

7.  Now you’re ready to cut out your fabric.  If you aren’t doing trim, cut at your second line a half an inch out.  If you are doing some kind of trim, then cut at your first line, which should be right at the edge of the styrene, like this:

cut out

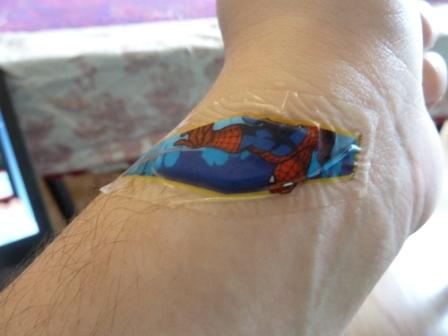
8.  This isn’t a step per se, but Spidey and I would like to take a brief moment here to point out that rotary cutters are SHARP!  An absent-minded brush against one might result in bleeding and a momentary halt in your project.

don't cut yourself

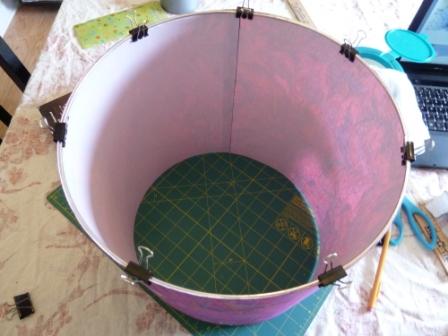
9.  Get out your lamp rings and lay them on the table.  Make sure they lay flat.  If they don’t, you can bend them a bit until they are even all away around.  My were in good shape.  Get out your binder clips and glue, too.

tools

10.  Okay, now you’re going to roll up your fabric into the shape of a shade. Hold the bottom lamp ring just inside the top of the fabric, and use the binder clips to get the ring to stay in place there.  It looks like this:

1st clip

Once you have the bottom lamp ring in, flip the shade over, and repeat the process with the washer top lamp ring.

1st clip top

At this point you’re not trying to glue anything, you’re just seeing how the rings fit into the fabric you’ve cut and you’re going to mark the seam where the fabric comes together.  The seam is right here:

first clipping for seam

11.  Now that you have both rings clipped in, you want to mark where the seam is.  Take a pencil and on the inside of the shade make a few marks where the seam comes together.  Also make an arrow or a “T” to designate which side is the top.  Your top and bottom rings sometimes are slightly different, so once you’ve marked the seam, you want to keep the the top ring on the side you marked top, and the bottom ring on the bottom.

marking the seam

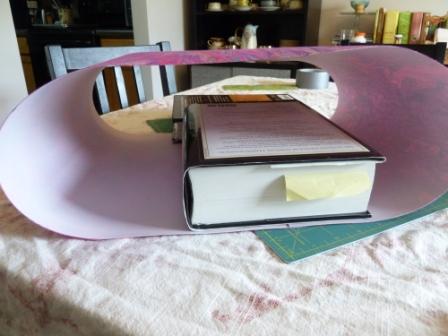
12.  Remove all the clips and and rings.  Unroll the shade.  Grab your glue and place some glue on the edge of the fabric that isn’t going to show when you overlap the seam again.  Glue your seam together like it was before.

glueing the seam

Don’t clip it all back together, though.  Just set it on your table and weigh down the seam with some heavy books for about ten minutes.

weigh down seam

13.  Now that the seam is set, we’re going to glue in the rings.  Again, depending on no trim/trim this is different.  Either way, do the bottom ring first, so looking for your little arrow or “T,” place your shade bottom side up.

Locate your seam, and place one binder clip there, with the little tab wing up.  Locate the weld joint on your bottom ring and place it in the tab wings of the clip and let it just rest there.  This helps you glue one side of the ring in while keeping the other side from constantly falling down into the bottom.

welded edge in clip

Next, run a line of glue around the rim of the shade, placing the bottom ring along the glue line and securing the ring there with a clip.

glue and clip bottom

If some of the glue smears down below the ring, you can just wipe it off.  I used some Clorox Wipes as needed.  A wet paper towel would probably work fine, too.  You’ll also probably need something to wipe your hands on, as they’ll get some glue on them, too, as you adjust the ring all away around.  It’s important to keep things neat as possible, or it’s easy to start getting glue on the fabric side where it’s harder to clean off.

If you opted for the no trim method, then you’ll have a half an inch of extra material that you can tuck up and around the ring with your molding wand. You might need to add some glue to the fabric, not just the shade/ring. Again, you might want to refer to the video for a visual.

Let the ring dry for about ten minutes again.  Once it’s dry, flip it over and repeat the process with the top washer ring.

let bottom & top dry

14.  If you’re in the no trim camp, you’ve got to be feeling pretty good right now, because you’re done.  For the rest of us who like things just a little bit fancy, get out your paper tape.  The no trim people had extra fabric to tuck under to make sure nothing frayed at the edges.  For us, the paper tape is going to help with that.  Plus, then the bias tape attaches to it.

First, with your lamp shade flat against the table, and a pencil as flat on the table as you can, mark a line all the way around on both the top and bottom of your shade.  This will give you a remarkably straight line all the way around, about an 1/8″ down from each edge.

mark for tapeStarting at the seam, and lining your paper tape up at this pencil line, starting gluing the tape all the way around the bottom of the shade.  There will be a lot of tape sticking up over the edge of the shade.

glueing on tape

Once you have gone all the way around, then run some glue on the inside rim of the lamp shade at the ring, and start tucking the paper tape under the ring as best you can.  The molding tool helps if you bought it.  If not, just use your fingers.  It doesn’t have to be perfect as the bias tape will cover the paper tape.

tucking tape under

If you remember from our calculations earlier when the shade was flat, it was 38.5 inches wide, which means I needed at least 38.5 inches of paper tape for both the top and bottom, for a total of 77 inches of tape.  My brain was not working correctly, and I only ordered a yard of the tape, which is 36 inches.  The Lamp Shop was generous and gave me a little more than a yard, so I was able to get all the way around my bottom ring before I ran out and realized my mistake.  All I could find that was even remotely close to the paper tape in a craft store was decorative Washi tape.  It worked fine, but looks a little silly.

washi tape

For the top ring, applying the paper tape is the same, except you’ll have to cut out some little triangles to avoid the spokes of the washer top.

cutting tape

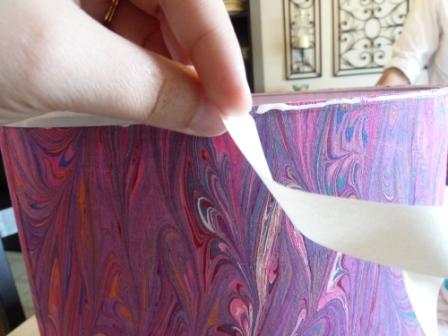
15.  The last step is gluing on your bais tape.  I’d start with the bottom ring again, just because it’s easiest.  Open up your bias tape and lay it flat and apply glue to the inside for a few inches.

glueing bias tape

Starting at the seam in the shade, glue it on.  The middle crease of the bias tape should rest nicely along the rim of the shade, acting as a natural guide.  Just keep gluing it down a few inches at a time.

keep going

Once you’re done with the bottom ring, just do the same with the top.  When all the bias tape is glued on, you’re done!  Whew, finally!

16.  After you’ve let it dry a bit, attach your new shade to your lamp base, plug it in, and admire your handiwork.

lamp lit


New Kitchen Tools that Delight and Amaze

I’ve been married for fifteen years now (I was a mere child when wed), so this year several old kitchen standbys that I received as wedding gifts gave up the ghost. I told my husband we’d officially been married a long time because we’re outlasting our registry. Because I’m a serious Type A nerd, I can’t just go to the store and get a simple replacement off the shelf. No, I have to research these things. For days. That’s right, I researched Tupperware replacement for days.

Now most people get excited about the next iPhone or perhaps the advancements in HD technology. Me, I geek out in the advancements in kitchen equipment. People, there are awesome new things out there I did not know about. I thought maybe it was just me that would get excited about these wonders, but on recent visits, both my mom and sister were intrigued by my new acquisitions.

So, I thought I’d share some kitchen love. Here’s a few of my new favorites.

The Grapefruit Knife

grapefruit-knife-original

Yes, it’s a unitasker, and I usually am not a fan of those. However, it doesn’t take up much room, and it does its one task really, really well. It also makes grapefruit spoons unnecessary, and they take up more room than the knife.

GRAPEFRUIT-KNIFE-One side of the tool has a double blade that cuts down both sides of a segment at once. The curved knife side you use to cut around the rind. It cuts both the sides and the bottom of the segments away from the rind. Basically, once you’re done with the knife, your perfectly segmented pieces just plop into a bowl for eating and you can pitch all the stuff you don’t want into the trash.  Price:  Varies, usually between $4-7, depending on brand.  Can be found at Crate and Barrel or Amazon.

Joseph Joseph Colander

I had a pretty basic old colander that did the job that looked like this:

white colandar

However, I was always trying to bend it to sort of make a funnel at one end so that it would pour its contents into bowls without slopping everywhere. All that bending is why it eventually cracked. It also had this annoying tendency to tip over at inopportune times. Really, though, when is it an opportune time for your colander to tip? This beauty solved my problem:

joseph colander

It sits firmly on little feet and pours exactly where I want it to. I happen to love that it comes in purple, too.  Price: Usually around $15 for the large size.  It’s in most home stores like Bed, Bath, & Beyond, and Amazon has a full complement of colors.

Silicone Splatter Shield

colourworks-silicone-splatter-screen-28cm-red-hang-tagged-da3739-9000062-0-1341824574000

I have gone through a number of metal splatter shields. I don’t use them as splatter shields as much as for draining grease off of meat. They’re large and gangly, though, usually shoved into the same cupboard as my baking sheets and griddle where they die a slow death of many gouges until they rust out. When I went to look for a replacement this time, I found this silicone option. Oh, what a glorious day! All the little holes allow me to drain grease just fine, and the silicone handles the heat like a pro. Clean up is easier, I’m not ingesting any more rust, and it has held up to cupboard jostling a lot better, too. Now if only it came in purple.  Price: I’ve bought more than one of these now, some as gifts.  I’ve only been able to find them on Amazon, and the price fluctuates from $16-23.

Snapware Total Solution Pyrex Glass Spillproof Food Keeper Set

snapware

I’m a little embarrassed to tell you the total hours I spent researching food storage options before I settled on this one. But really, what is more frustrating that terrible Tupperware? Okay, a lot of things, I guess.

I wanted something BPA free that was microwave and dishwasher safe. I also didn’t want one round of spaghetti to turn them disgusting looking. I was leaning towards glass, but they absolutely had to be spillproof. Zero leaking, or I wasn’t interested. It would also be wonderful if they stacked with each other so they could take up less room in a cabinet. Oh, and something I didn’t know needed to be a criteria until I started reading reviews: if glass, it should be sturdy glass, not glass that occasionally released little shards into your food! Turns out wanting all of those things in a food storage container was asking a lot. Finally, I found these beautiful, beautiful babies. They met every criteria and even have lids that you can write what’s in the container and the date and then wipe it off/wash it off in the dishwasher.

Price: We found them cheapest at Costco ($29.99), who even has a coupon for them sometimes ($6 off). After a couple months with the first set, we bought another.  They are at most other home goods stores and online, but you can pay as much as $50 for the same set.

Honorable Mentions:

OXO Jar Spatula

1241581_Jar Spatula_white

This is at least my second, maybe my third of these. This one is the best design by far. They have all had a great long handle and long, thinner spatula for getting into the nooks and crannies of jars. However, previous iterations have eventually been hacked up by the sharp edges of the jars themselves.   This model is much, much thicker so I am optimistic it might fair better. Price: around $7 and found at pretty much anywhere that sells home goods.

OXO Silicone Basting Brush

basting brush

I think these have been around for awhile now, and I’m just late to the party. I had a natural bristle brush with a metal band that was hard to clean, and was constantly imparting “essence de rust.” The new one cleans up nicely in the dishwasher, and OXO’s model in particular has these nifty little holes that soak up and hold your basting liquid. Price: $8-12, and again is pretty widely available.

Zyliss All Cheese Grater

zyliss grater

When my box grater died, I was not eager to buy another one. They’re known to grate skin as well as cheese and never seem to stay put on the collection plate. I bought this drum grater which has both a coarse drum for softer cheese like cheddar, and a fine drum for harder cheeses like parmesan. Overall, I am pleased with it and much prefer it to my box grater. However, I did have a piece of the coarse drum break within 6 months. Zyliss replaced for free after I emailed them a picture of the break. The handle could also be a bit longer, because it can be a challenge sometimes to get a grip on it to really get it going good. Still, miles above a box grater, but I could see where it might frustrate some. Price:  $14-22 and is a bit harder to find.  Crate and Barrel and Amazon both have it.


How To Can Your Own Jelly

jelly

This is an update to a post I did a few years ago on my food blog.  I’ve learned a few things now that I’m not a complete canning newbie.  I made another couple dozen jars of jelly over the weekend, sort of on the spur of the moment.

I always mean to plan it better so I can have people over and show them how it’s done.  Of my community of friends I only know of one other person who cans, despite several others expressing the desire to learn.  It really is pretty simple, but it sounds intimidating, which is why I want to show people first hand it is nothing to be afraid of.

Since once again I was not organized enough to have people over, I took more pictures in hopes people would be brave enough to try it on their own.  Here’s proof it’s not too hard.

First off, you will need a little bit of specialized equipment, but not much.  You need jars, lids (you can only use them once), a canner with a rack, and a jar funnel (I already had as part of a Kitchen Aid funnel set).   If you have a bit of cash to spare, you could also get jar tongs and a lid lifter, but I just used my spring loaded tongs and it worked fine.  Plus, I’m not a big fan of unitaskers.

tools for canning

Aside from a canner, all you really need to get started are jars, lids, a canning funnel, and a container of pectin.

For 12, 8 oz Ball jelly jars which came with new lids and even little labels, it was about $8.  The canner with rack was $19.  Check to make sure there is actually a rack in your canner.  I had to look into 4 canners before I found one that still had the rack.  Now who steals canning racks out of pots at Walmart, I have no idea. The canning supplies are usually in the kitchen/home goods section.

Step 1:  Sanitize your jars.  Especially if your jars are new, this is more to get them hot so they don’t shatter when you fill them with boiling jam.  You can do this in the dishwasher, but if yours is like mine, this takes forever.  You also have to time it so your load is finishing as you’re starting to can so the jars are still warm. It’s actually faster to just boil the jars in a large pot, then hold them in there to keep them warm.

I think it's easiest to sanitize in a stockpot.

I think it’s easiest to sanitize in a stockpot.

Step 2:  Fill a small pot of water and heat it until little bubbles start to form, but not a rolling boil.  Turn it off, wait a minute, and then put the lids in.  You have to get them hot, but you can’t boil them or the sealing compound might not work right.  I accidentally let mine boil at one point and they still worked, but I caught it pretty quickly.   Let the lids stay there and keep warm.

I do the lids in my smallest saucepan.  Your stove top can get pretty crowded, so it' nice that at least one burner not be a space hog.

I do the lids in my smallest saucepan. Your stove top can get pretty crowded, so it’s nice that at least one burner not be a space hog.

Step 3:  Fill your canner a little over half way with water and set it to boil with the lid on and the rack not in it.

Step 4:  Now you actually start working on the jelly part.  A word here about pectin.  That’s what makes jelly gel.  Some fruits have enough natural pectin that you don’t have to add any.  I made this rhubarb jam recipe from Allrecipes and because it used orange zest and  juice which are high in pectin, you don’t need anything else.  It tasted great and gelled just fine with a little additional cooking.

However, a lot of fruits you’d want to make jam out of (strawberries, raspberries, blueberries, peaches, sweet cherries, apricots, nectarines) are low in pectin and need it added for your jam to work.  Pectin is normally a ton of sugar.  Jam recipes also call for around 4 cups of sugar.   That’s also why most jelly you buy in the store is super sweet.

One of the reasons I like making my own jam is I can control the level of sugar.  I actually like my jelly to have more of a sweet/tart balance that allows me to taste the fruit, not just sugar.  However, because I put in less sugar, I have to use a special pectin designed for low sugar/no sugar jellies to make sure it sets correctly.  It also doesn’t add a lot of additional sugar like normal pectin.  Ball makes one I like.

I looked at a few recipes before settling on this one.  I’ve used it multiple times with several different kinds of fruit. Don’t try to make more than 10 jars at once as your pectin won’t work right.  To make 8, 8oz jars of jelly, you need the following ingredients:
6 heaping cups of mashed fruit (this is about 8-10 cups pre-mashing)
7 tablespoons Ball low sugar pectin (a little more than the directions say)
2 cups sugar (you can try more or less depending on how tart you like it)
4 tablespoons lemon juice (optional, but helps the flavor.  I tried some with and without, and I like it with
the juice)
1 tablespoon cinnamon (good with stone fruits, but wouldn’t necessarily add to berries)

My strawberries pre-mashing.  I had over 8 cups in there.

My strawberries pre-mashing. I had over 8 cups in there.

First you clean and cut up whatever fruit you are using and mash it in a batter bowl with a potato masher.  You don’t have to completely pulverize it, as some chunks are good, and it will get runnier after you cook it.

strawberries postmash

My strawberries post-mashing. My 8 plus cups went down to less than 6, so I had to add more.

Once you have your six cups, pour it into a medium sized stockpot, preferably a nonstick one.  Even then, jelly is so sticky, it took me awhile to get my pot clean.  Next, mix your pectin and 1/4 cup of the sugar together in a small bowl then add it to the fruit.

Adding in the pectin/1/4 cup sugar mixture before cooking.

Adding in the pectin and 1/4 cup sugar mixture before cooking.

Place this on the burner and bring to a boil, but keep stirring it.  I got distracted once cutting up fruit for my next batch, and it burned up enough of my strawberries that I only got 6 jars instead of 8.  Once it reaches a boil, add the rest of your sugar and bring to a boil again and let it boil hard for one minute.

Watch out during the hard boil.  There's a reason my spoon is so long here.  I'm trying to keep my distance from that very hot liquid that keep trying to jump up and burn me.

Watch out during the hard boil. There’s a reason my spoon is so long here. I’m trying to keep my distance from that very hot liquid that kept trying to jump up and burn me.

At this point, you need to test to see if it is jelling how you like.  Stick a teaspoon in the jelly, scooping up just a little bit.  Blow on it until it cools.  My firmed up nicely, and I tasted to see if the sweetener was right, too.  If it’s not sweet enough or needs more pectin, add a bit more now.  If all is good, move on to the next step.

If it's gelling good, when you run a finger through the goop on the spoon it will leave a trail.

If it’s gelling good, when you run a finger through the goop on the spoon it will leave a trail.

Step 5:  Pour into jars.  Turn the heat off on your stockpot.  Get a few jars out of your pot/dishwasher, and set them near the stockpot.

getting jars out

Carefully pour any water out of the jar as you remove it with the tongs.

Put your jar funnel in the first jar, and ladle the hot jelly into it up to within 1/4 inch of the top of the jar.  This is basically where my funnel stops, so I just filled it to the funnel.  If you notice any air bubbles, you can pop them with a little spatula by running it around the sides.  You also can skim off any foam that might have formed for a prettier jar of jelly, but it doesn’t taste bad.

ladling jelly

Just pour to where your funnel ends. You don’t want to overfill the jars or they won’t seal right.

Then using your tongs or lid lifter, pick up one lid from the hot water.

grabbing lids

Place it on the jar and then screw on the lid so it’s on, but don’t go crazy tight with it.  If you have a little bit of jelly left, but not enough to fill a jar, just put it in a tupperware in the fridge and it will stay good for about 3 weeks.

Jars with the lids on, but the rings aren't screwed on yet.

Jars with the lids on, but the rings aren’t screwed on yet.

Step 6:  Once you’ve got all your lids on, place your jars in the canning rack and lower it into the boiling water of the canner.

The jars will probably wobble around and maybe even fall over, but it's not a big deal.

The jars will probably wobble around and maybe even fall over, but it’s not a big deal.

Make sure the water covers your jars by about 2 inches.  Boil it for 5 minutes, then take the jars out by lifting up the rack.  You’ll start to hear little pop, pops as the jars start to seal themselves.

Make sure you use potholders to raise and lower the rack in the canner so you don't burn your hands.  Also, for handling the jars right after.  They're hot!

Make sure you use potholders to raise and lower the rack in the canner so you don’t burn your hands. Also, for handling the jars right after. They’re hot!

Wipe any excess water off, and let them cool on a towel, so they don’t cool so fast that they crack.  Sometimes you can get the jars to seal without this last step, but you’re more likely to get a few duds (lids that pop up and down when you press a finger on them) that didn’t seal and you have to eat right away.  Also, the processing helps reduce spoilage and gives longer shelf life.  It’s one of the easiest steps, so I’m not sure why some people skip it.

Let them set for about a day, and recheck the lids to make sure they sealed properly.  Then label and store your jam.  Labeling on the side of the jar is nice for giving it away as a gift.  However, those labels are difficult to get off.  For your own use and reuse of the jars, it’s easier to just label the lids with a Sharpie since you only use the lids once anyway.

I was pleasantly surprised how easy it was.  It does have several steps, but once you get it all set up, you can make back to back batches.  I made 24 jars of jelly in about 3 hours, and that was my first time.

A lot of people are real purists and only use fruit from the farmer’s market or that they picked themselves.  For my first batch I used California strawberries from Costco.  You can call me a fruit heretic, but they tasted better than the ones I got at the Durham Farmers Market, and were a heck of a lot cheaper.

The second batch I used apricots I got at Costco again.  Once I mashed them all up, I didn’t quite have 6 cups, so I added some cut up mango I had leftover from I trifle I made the day before, and some cinnamon.  It was very tasty.

The last batch I really threw in everything but the kitchen sink.  I had about 2 cups of strawberries left, then I threw in a pint of blueberries I had in the freezer, and the last third of a bag of frozen triple berry blend (raspberries, blueberries, and marionberries) from Costco.  I defrosted all the frozen fruit before I mashed it up.  I still didn’t have quite enough fruit, so I defrosted a package of blackberry pulp I get at my Latino grocery store and use to make blackberry iced tea.  After I threw that in, I was still short about a cup, so I picked all the strawberries out of another bag of frozen mixed fruit that I bought a while back to make smoothies.  All this together made a 5 berry jelly that actually tasted the best of the bunch!

I have to say, I felt very proud of myself looking at all my gleaming jars of jelly cooling on my dryer.  Try it for yourself!


I’m not dead, just cooking.

I wanted to put up a short note over here since I have been a bit neglectful.  I have several posts in the works as I tackle a few home decor projects.  However, I have hit a few road bumps that have delayed their completion. 

Also, I’ve been cooking a lot.  For those of you that don’t know, I also have a recipe blog over at durhamfoodandart.blogspot.com.  I’ve had a flurry of posts over there.  Often I neglect that blog in favor of this one, but right now the roles are reversed.  Until I get back in the swing of things here, perhaps you can explore some of the yummy things I’m cooking over there, like this life changing Dr. Pepper Pork Sandwich:

Image

Clothing Items to Avoid When Bargain Shopping at Anthropologie

If you have unlimited resources, by all means, buy whatever you like at Anthropologie. However, most of us with more limited budgets need to pick and choose how we spend our pennies at this lovely store. If you want to get the Anthropologie look for less, it’s best to buy some of Anthro’s signature pieces and avoid what I consider their filler items. When you are physically at the store, you can lose your head and begin to want EVERYTHING. Stop and consider that certain items are not at all magical and unworthy of the Anthro high price tag or probably even slightly lower sale prices.

So maybe they're making a comeback, but I haven't seen anyone wear overalls for a decade.  I'm not willing to spend $475 on these, are you?

So maybe they’re making a comeback, but I haven’t seen anyone wear overalls for a decade. I’m not willing to spend $475 on these, are you?

1. Jeans. I am well aware that a pair of jeans that fits you well is worth its weight in gold. If nothing fits you like Anthro jeans and you got them on some super clearance, then MAYBE it’s worth it, but otherwise don’t buy jeans here. They run from $98 to a whopping $475 a pair, averaging out at about $200. If you take off the Anthro goggles, you see they are just your basic selection of skinny, bootcut, wideleg, crops, cuffed, preripped, etc. I promise you can find jeans you’ll like for less pretty much anywhere.

Which pants are from Anthro and which are from Gap?  If you can't tell, I'm not telling.  The only difference I see is the $178 difference in price.

Which pants are from Anthro and which are from Gap? If you can’t tell, I’m not telling. The only difference I see is the $178 difference in price.

2. At least half of their pants. Much like their jeans, most of Anthro’s chinos, trousers, cargos, and joggers are not that different from what is offered at your neighborhood department store or Gap. What are distinct are their patterned wide leg pants and silk trousers that look like they came from some far off bazaar. If you are going to buy pants you can’t find somewhere else cheaper, get those.

Remember, you're looking for something distinct.  These lace shorts are something I haven't seen someplace else.  Look for something like them, not a basic cotton short in khaki.

Remember, you’re looking for something distinct. These lace shorts are something I haven’t seen someplace else.

3. Half of their shorts. Are you sensing a pattern? If it goes on the bottom half of your body, take a moment and really look at them. Are they a basic colored cotton or denim short? Did they do anything interesting with them like add a scalloped lace edge that makes them uniquely Anthro? If not, please don’t pay $178 for them.

Yes, the Anthro picture looks more glamorous, but their tee is still a cotton, black and white striped 3/4 sleeve tee, which make it awfully similar to this Old Navy one in my book.

Yes, the Anthro picture looks more glamorous, but their shirt is still a cotton, black and white striped 3/4 sleeve tee, which makes it awfully similar to this Old Navy one in my book.

4. Basic tees and tanks. In general, tops are where you get your money’s worth at Anthropologie. However, lurking amidst the lacy confections and silks that look like watercolors are solid color v-neck tees and striped long sleeve shirts. Do not pay $78 for that nonsense. Go to Old Navy and pay $10.